Announcement

Collapse
No announcement yet.

2005 Chevy Corvette build & upgrades thread

Collapse
X
 
  • Filter
  • Time
  • Show
Clear All
new posts

  • The next part of my install - was prepping and painting the LSA/LS9 valve covers.

    I had used a set of Holley LS valve covers on my E-Force install on the Corvette - and I had nothing but issues with them.

    I had PCV/oiling issues since the E-Force eliminated the valley port vent - and made you use the drivers side rear port vent for the new PCV routing.

    This lead to a lot of oil getting sucked up through the Holley valve cover - and went straight into the blower. The Holleys did not have a built in check valve - and this contributed to the oiling issue.

    The Holley Valve covers also leaked oil out of the center bolt holes - as well as the perimeter gaskets as well.

    This lead me to return the Holleys and go with the LSA/LS9 valve covers.

    I prepped and painted the valve covers - and added a check valve/catch can on the Corvette and this solved all of my pcv/oiling issues.

    Since I did not want to repeat/have any of those issues on the SS - I bought another set of LSA/LS9 valve covers.

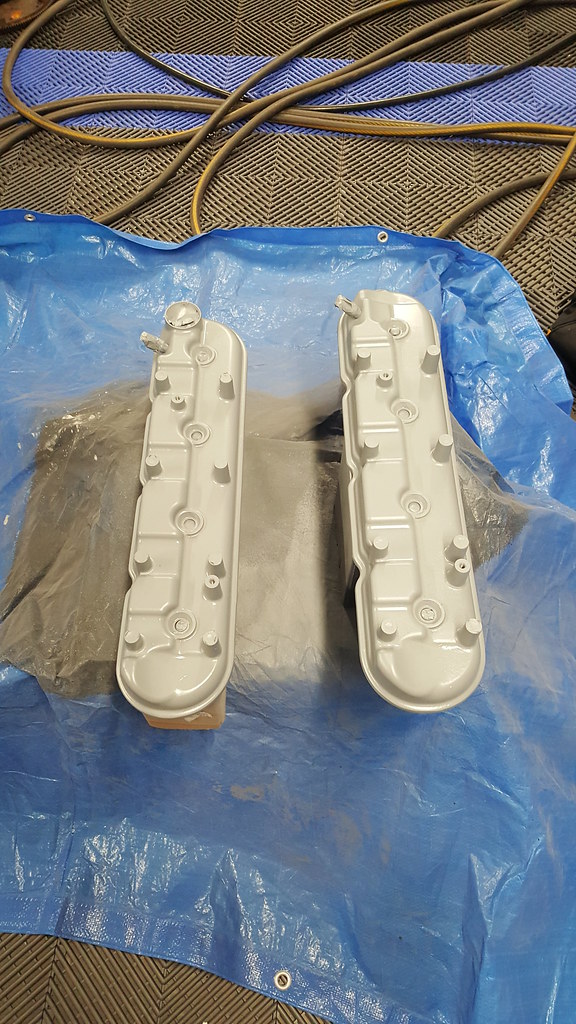
    I tore the new valve covers down, cleaned up the outer surface - and then painted them with VHT Engine primer and then VHT GM Flat Black Engine Paint.

    It took 3 coats of primer - 2 light coats, 1 heavy coat and I was ready to paint. It took 3 coats of base - again 2 light and 1 heavy coat.

    Parts used:
    LSA Valve Cover - Drivers - 12637688 - http://amzn.to/2sELwZM
    LSA Valve Cover - Passenger - 12637686
    LSA Supercharger

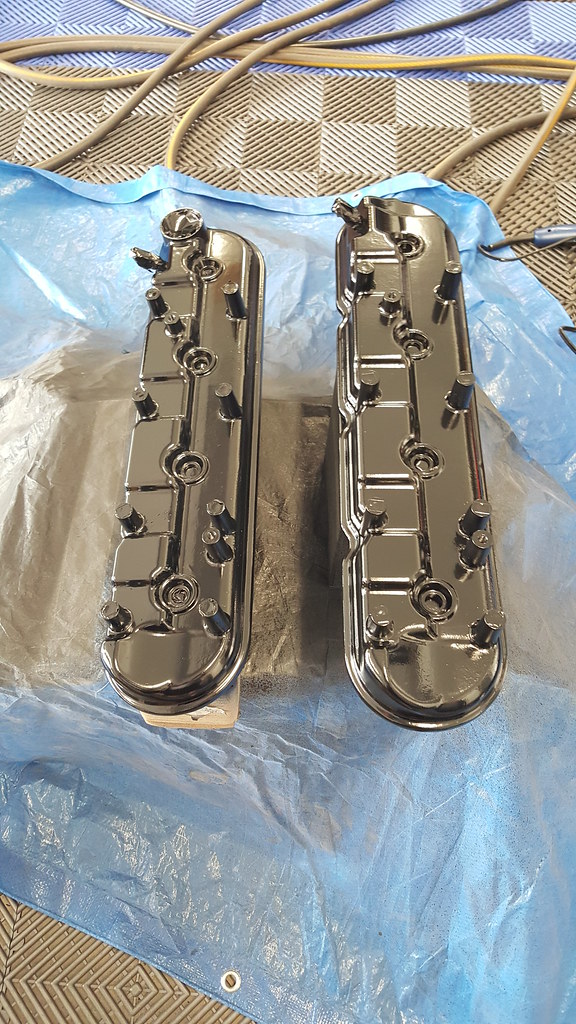
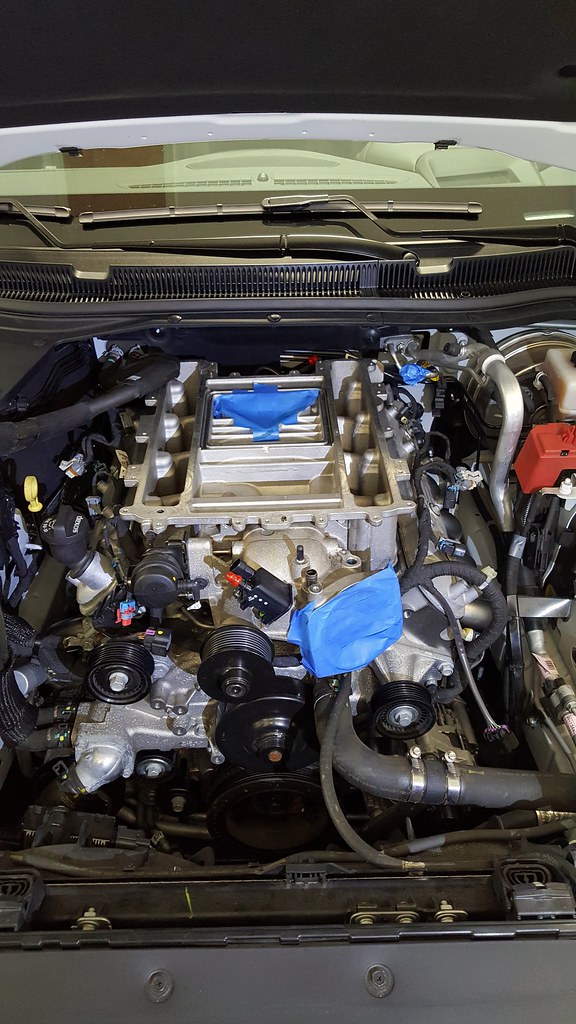
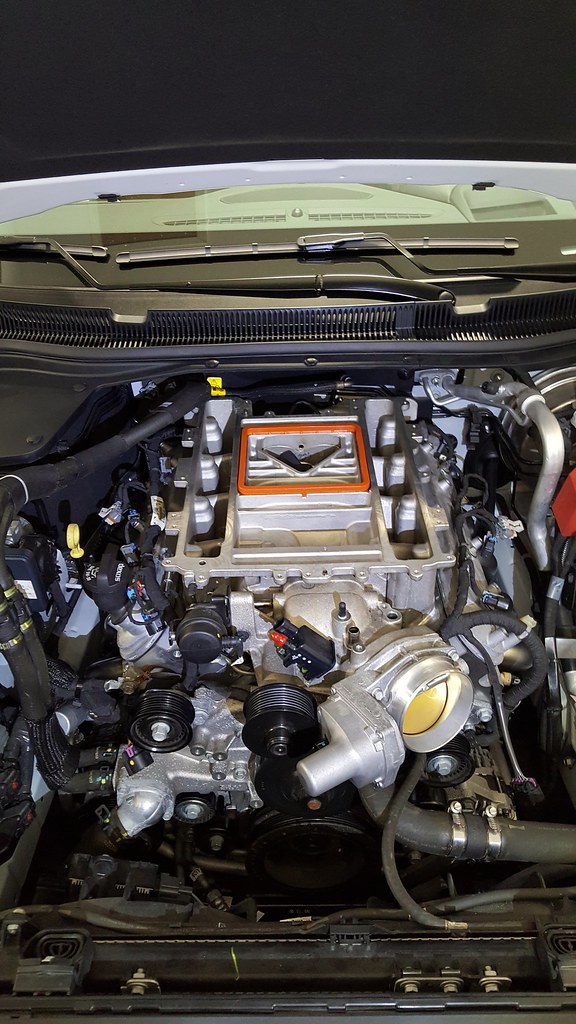
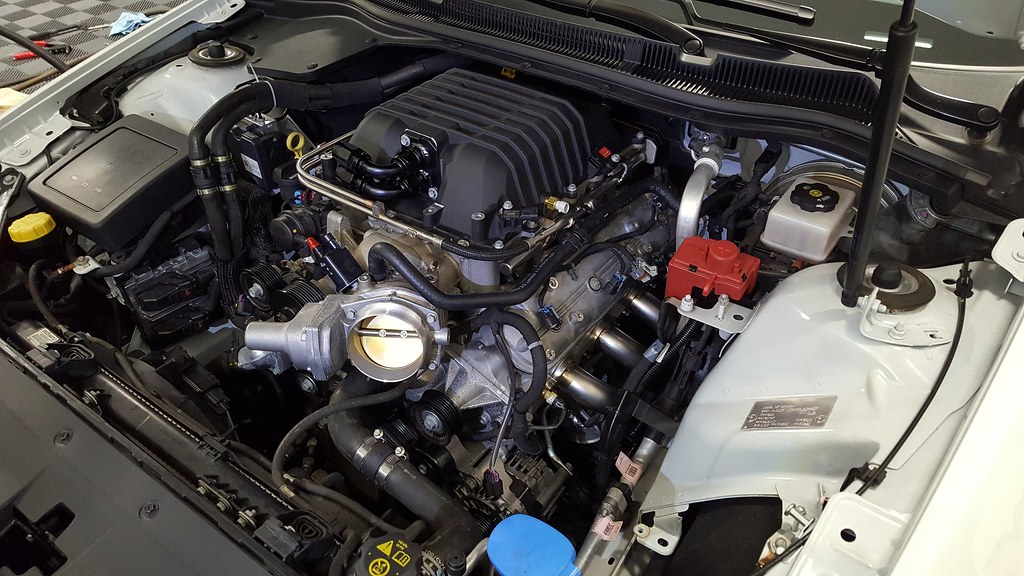
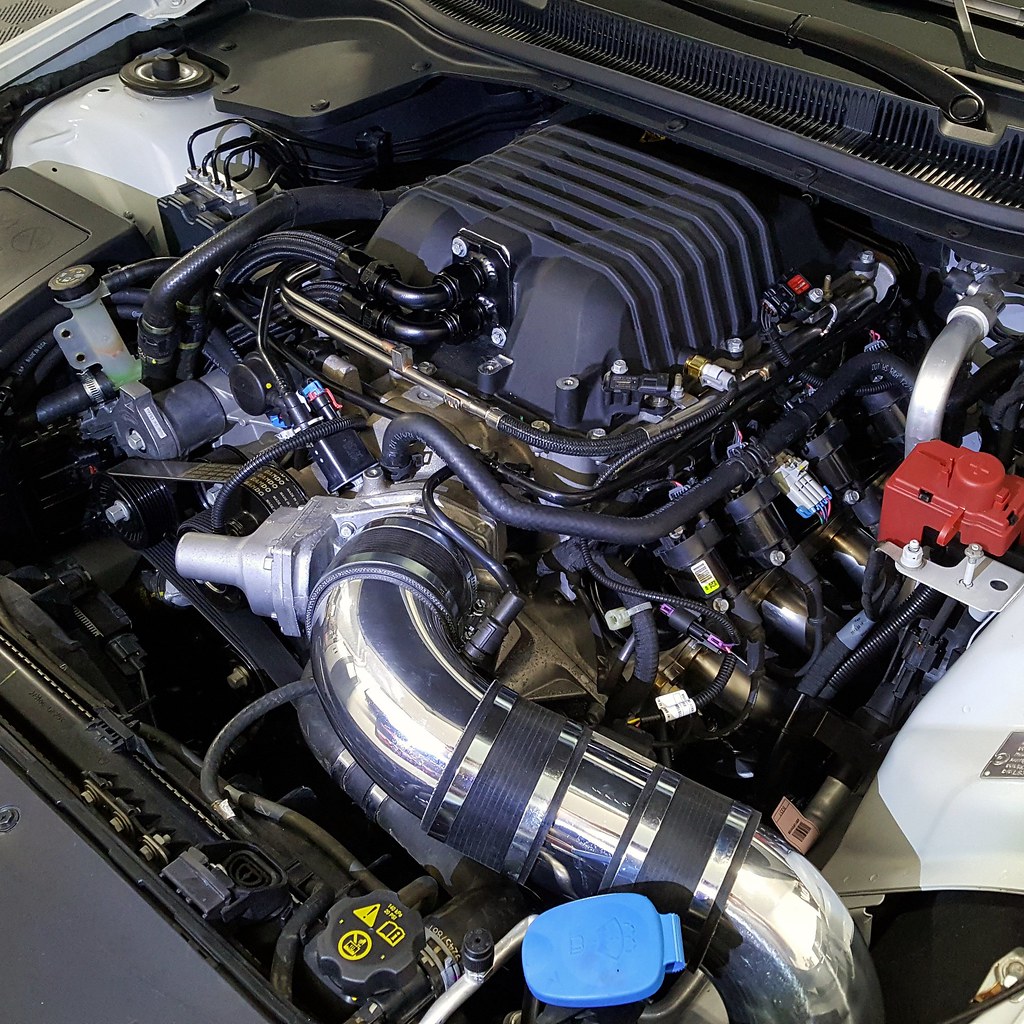
    Here are the final pics:


    For the full in depth valve cover prep/painting - please see my full video below:


    Follow me on Instagram: https://www.instagram.com/bonecrrusherss
    Follow me on Twitter: https://twitter.com/bonecrrusherss
    Like me on Facebook: https://www.facebook.com/bonecrrusherss
    Last edited by bonecrrusher; June 7, 2017, 02:24 PM.

    Comment


    • Well...that works! Way to Improvise, adapt, and overcome!
      Patrick & Tammy
      - Long Haulin' 2008, 2009, 2010, 2011, 2012, 2014...Addicting isn't it...??

      Comment


      • Thanks Silver Bullet!

        I have finally started the install!

        I begin the tear down by removing the factory LS3 intake, LS3 fuel rail/injectors - and TB. This didn't take too long as you really only need one special tool - the fuel line quick disconnect tool - and a set of sockets and ratchets to remove the fuel rail, tb, and the intake manifold itself.

        Then I started with the lower blower housing - installed the bolts and torqued to spec.

        Then I installed the ZL1 lid/intercooler housing - and torqued to spec.

        I finished off the day by installing the fuel injectors, fuel rail, brake booster vacuum hose, TB, and the fuel evap purge solenoid.

        When I started out - I only meant to mock up the blower itself - but in the end I almost finished up the entire install!

        Parts Used:
        LSA Supercharger
        ZL1 Lid - 12622236
        ZL1 fuel rail - 12622235
        60 lb/hr Fuel Injectors
        ZL1 Fuel Evap Solenoid - 12639188 - http://amzn.to/2sh35BV
        ZL1 Fuel Line - 22912576
        ZL1 Brake Booster Hose - 20944524 - http://amzn.to/2sgHvxC
        CTS-V Fuel Evap tube - 12605523
        STG Motorsports Heat Exchanger - https://www.facebook.com/STGMotorsportsSTL/

        Now for the pics:


        For my full review - please watch my video below!


        Follow me on Instagram: https://www.instagram.com/bonecrrusherss
        Follow me on Twitter: https://twitter.com/bonecrrusherss
        Like me on Facebook: https://www.facebook.com/bonecrrusherss
        Last edited by bonecrrusher; June 7, 2017, 02:12 PM.

        Comment


        • To continue with the blower install - I installed the STG Motorsports custom front heat exchanger.

          I was originally going to go with the ZL1 heat exchanger - and it would have bolted up with some custom bracing - I would have had to move a bunch of sh*t to get it to work.

          I would have had to move the transmission cooler - as well as move the windshield tank container.

          I installed the CTS-V style intercooler pump - as well as ran the Magnuson IC pump wiring harness.

          I installed the LSA front accessory drive - this includes the LSA crank pulley, LSA idler bracket, and the LSA tensioner.

          I also pinned the LSA crank pulley - and installed an ARP crank bolt/LSA supercharger belt.

          Parts Used:
          LSA Supercharger
          ZL1 Lid - 12622236
          Custom Heat Exchanger from STG Motorsports
          Bosch IC Pump - 0392022002 - http://amzn.to/2sEKQ70
          LSA Crank Pulley - 12603916 - http://amzn.to/2sgUjUH
          Magnuson IC Pump Harness - MAG-82-55-80-059
          ARP Crank Bolt - 234-2503 - http://amzn.to/2s58AE3
          LSA Supercharger belt - 12636227 - http://amzn.to/2rWw4KN

          Now for the pics:

          For my full in depth install - please watch my video below!


          Follow me on Instagram: https://www.instagram.com/bonecrrusherss
          Follow me on Twitter: https://twitter.com/bonecrrusherss
          Like me on Facebook: https://www.facebook.com/bonecrrusherss
          Last edited by bonecrrusher; June 7, 2017, 02:00 PM.

          Comment


          • To continue with the LSA install - I needed to come up with an air intake.

            Using a few pieces from Spectre - I came up with a design that would go into the fender well where the stock intake routed.


            I pieced this kit together using Spectre 4" intake parts - and it went in really easy.

            I got this setup for about $150 - and it worked perfectly.

            You can go aftermarket - but companies want $400+ for a box setup - that you have to modify!

            Your going to end up spending close to $500 for a poor performing intake!

            So for the little $$ investment that I have - I am more then happy with the outcome.

            Parts Used:
            Spectre 4" 90* - http://amzn.to/2sEUEh1
            Spectre 4" Black Cone Filter - http://amzn.to/2r7egbD
            Spectre 4" MAF Sensor Housing - http://amzn.to/2sEWluY
            Spectre 4" 90*/J Bend - http://amzn.to/2sh0VSQ

            Pic:


            For more information on my setup - please watch my video below!


            Follow me on Instagram: https://www.instagram.com/bonecrrusherss
            Follow me on Twitter: https://twitter.com/bonecrrusherss
            Like me on Facebook: https://www.facebook.com/bonecrrusherss
            Last edited by bonecrrusher; June 7, 2017, 02:33 PM.

            Comment


            • Your fleet is top notch..

              Comment


              • Thanks Bob!

                I installed an Elite Engineering Catch can on my LSA Supercharged SS.

                The install is pretty straight forward - I had to cut the lines to the length that I needed, then assemble the AN fittings - and tighten everything down.

                The catch can intstalls between the Blower and the Valley vent tube.

                This catch can should help catch any oil coming from the engine and going back into the system by being trapped before the blower snout.

                I also instaledl the PCV system - using the ZL1 PCV tube - I connected the drivers rear port, the passenger front port - and connect to the intake tube.

                I added a check valve - and plugged this into the 90* Spectre intake hose before the throttlebody. I then plugged in the ZL1 PCV tube into the check valve.

                I also fired up the car for the first time! Sort of - the car won't hold an idle with the bigger injectors, new MAP sensor, as well as the Corvette style MAF sensor.

                For more info on the catch can - please watch my video below:


                For more info on the PCV system - please watch my video below:


                Parts Used:
                LSA Supercharger
                ZL1 Lid - 12622236
                LSA Valve Cover - Drivers - 12637688 http://amzn.to/2sAFLg2
                LSA Valve Cover - Passenger - 12637686
                ZL1 PCV Hose - 12622242
                CTS-V Fuel Evap Tube - 12605523
                Beck Arnley 045‑0299 PCV Valve - http://amzn.to/2rR7fA5
                Eliite Engineering E2 catch can - w/G8 bracket.

                Follow me on Instagram: https://www.instagram.com/bonecrrusherss
                Follow me on Twitter: https://twitter.com/bonecrrusherss
                Like me on Facebook: https://www.facebook.com/bonecrrusherss
                Last edited by bonecrrusher; June 6, 2017, 10:37 AM.

                Comment


                • Latest update on the SS - I installed the LED DRL harness from Gen5DIY.com.

                  This harness allows you to enable the DRL LED's to run all the time.

                  They will run with the low/high beams on - and even work when the foglights are on.

                  The install is pretty straight forward - take off the front bumper off of the car. Unplug the foglight/drl sub-harness from the bumper - and install the Gen5 harness - the plug the sub-harness back in.

                  Run the Gen5 wiring through the bumper - passed the radiator - and up to the fuse box.

                  Take off the fuse box cover - and remove the 20 amp fuse in slot #51. Plug in the Gen5 Add-A-Fuse plug into slot #51.

                  Trim the box and the cover to allow the harness to lay flat - and put the fuse box cover back on.

                  Parts used:
                  Gen5DIY LED DRL Harness


                  For more information please watch my video below:


                  Follow me on Instagram: https://www.instagram.com/bonecrrusherss
                  Follow me on Twitter: https://twitter.com/bonecrrusherss
                  Like me on Facebook: https://www.facebook.com/bonecrrusherss
                  Last edited by bonecrrusher; June 6, 2017, 10:38 AM.

                  Comment


                  • I have finally finished the LSA swap on the SS - in this video I get the car towed up to PCM of NC for its dyno tune.

                    Dyno results where 553 rwhp on a DynoJet chassis dyno.

                    That was at 7.8 PSI.

                    I am very impressed with these dyno numbers - honestly I was really only expecting around 500 whp.

                    The 60 #/hr injections that I installed are at their limit though - so if I go with a smaller pulley or any other mods - I will need a fuel system.

                    I drove the car back from the shop with no issue - and I am very happy with the results.

                    Parts Used:
                    LSA Supercharger
                    ZL1 Lid - 12622236
                    LSA Valve Cover - Drivers - 12637688 - http://amzn.to/2sAFLg2
                    LSA Valve Cover - Passenger - 12637686

                    For my information - please watch my video below:


                    Follow me on Instagram: https://www.instagram.com/bonecrrusherss
                    Follow me on Twitter: https://twitter.com/bonecrrusherss
                    Like me on Facebook: https://www.facebook.com/bonecrrusherss

                    Comment


                    • Latest update for the SS - I installed my custom build plate that I modified and had made by Signs.com.

                      I downloaded the 2014 template from the following thread on the SS Forums:
                      http://www.ssforums.com/forum/exterio...

                      I updated the template with the information that I received from Chevy Customer Service - and then I modified the template by finding the various logos and putting them in the template.

                      The template is a .PNG image file that I modified used Photoshop.

                      I used a transparent background - copied and pasted the black and white logos into - and deleted the white text.

                      This gave me a black and transparent image that I pasted into the template.

                      The sign was $23+ shipping from Signs.Com - and it took about week to get.

                      The install was fairly simple - just drill 4 holes in the sign, and the fuse box cover - and use 4 screws to install it.

                      For more information please view my video below:

                      Follow me on Instagram: https://www.instagram.com/bonecrrusherss
                      Follow me on Twitter: https://twitter.com/bonecrrusherss
                      Like me on Facebook: https://www.facebook.com/bonecrrusherss


                      Comment


                      • I have driven the Supercharged SS almost 500 miles - so I decided to do some maintenance and various systems check on the car.

                        I checked the oil catch can - saw a bit of oil in it - and I emptied it out.

                        I was checking to make sure that it wasn't full - and wasn't pulling oil back into the blower or the #Spectre Intake.

                        I also took the custom #Spectre intake system apart - and adjusted the MAF sensor as well as the cone filter.

                        When I hastily swapped the MAF sensors at the dyno shops parking lot - I didn't do a very good job lining everything up.

                        After a few adjustments - the intake looks good again!

                        Parts Used:
                        Elite Engineering E2 catch can - w/G8 bracket - http://amzn.to/2s5qQgT
                        Spectre 4" 90* - http://amzn.to/2sEUEh1
                        Spectre 4" Black Cone Filter - http://amzn.to/2r7egbD
                        Spectre 4" MAF Sensor Housing - http://amzn.to/2sEWluY
                        Spectre 4" 90*/J Bend - http://amzn.to/2sh0VSQ

                        For more information - please watch my video below:


                        Follow me on Instagram: https://www.instagram.com/bonecrrusherss
                        Follow me on Twitter: https://twitter.com/bonecrrusherss
                        Like me on Facebook: https://www.facebook.com/bonecrrusherss

                        Comment


                        • nice non cookie cutter build!
                          Patrick & Tammy
                          - Long Haulin' 2008, 2009, 2010, 2011, 2012, 2014...Addicting isn't it...??

                          Comment


                          • Thanks Silver Bullet! These SS's are so rare - you never see them.

                            Thankfully they are a Zeta - and all the cool bits from the Camaro bolt onto it!


                            Also - I've had a few people ask about my MaxJax - and lifting my lowered Corvette on to it.

                            Since the Corvette is so low - I had to find a way to get the arms under the car.

                            I do this by driving up on a set of Race Ramps Scale Weight Ramps, lift the back of the car with a floor jack, then put another set of scale weight ramps under the rear.

                            This gives me enough room to get up and under the car - and raise it with the MaxJax lift.

                            Tools Used:
                            Race Ramp: RR-SCALE-2 http://amzn.to/2sKXIHT

                            For more information - please watch my video below:


                            Follow me on Instagram: https://www.instagram.com/bonecrrusherss
                            Follow me on Twitter: https://twitter.com/bonecrrusherss
                            Like me on Facebook: https://www.facebook.com/bonecrrusherss

                            Comment


                            • I have had a lot of people ask me to put together a parts list/companion guide/how to - for the LSA swap into the SS .


                              In my newest video - I go over the parts list/install companion guide that I created for the LSA install.


                              I have listed all of parts that I used, prices I paid, and where you can get them.


                              In the companion guide I go over each section of the install and provide notes for each part of the install.


                              For more information and the links to the guides - please watch my video below:


                              Follow me on Instagram: https://www.instagram.com/bonecrrusherss
                              Follow me on Twitter: https://twitter.com/bonecrrusherss
                              Like me on Facebook: https://www.facebook.com/bonecrrusherss

                              Comment


                              • I took the Corvette up to a no prep test and tune at Zmax Dragway.

                                This is the first time that Zmax was open for the public this year. For the street tire guys - the 2 left lanes where not prepped at all.

                                The car spun through first and second - and I could not hook up at all.

                                The car ran terrible times on street tires. Next time I am going to get the drag radials mounted - and run on the prepped lanes.

                                To view all of runs - please watch the video below:


                                To counteract the spinning through 1st and Second - I decided to buy a set of drag radials and wheels.

                                I test fit a front C6 Z06 wheel on the back of the SS and the Corvette.

                                The wheel is 18x9.5 and is a 5 x 4.75 bolt pattern.

                                I plan on running a set of 305/35/18 Mickey Thompason ET Street drag radials in the back.

                                For my test fit please watch my video below:


                                Follow me on Instagram: https://www.instagram.com/bonecrrusherss
                                Follow me on Twitter: https://twitter.com/bonecrrusherss
                                Like me on Facebook: https://www.facebook.com/bonecrrusherss
                                Last edited by bonecrrusher; July 11, 2017, 06:56 AM.

                                Comment

                                Working...
                                X